Finally, set up and test conversion tracking so you’ll know exactly which ads are bringing you the most dollars and which are underperforming.
Conversion tracking is simple to set up with most eCommerce platforms.
Simply copy and paste your Facebook pixel ID into Shopify, WooCommerce, or your platform of choice.
#2: Set Up and Populate Your Facebook Ad Targeting Audiences
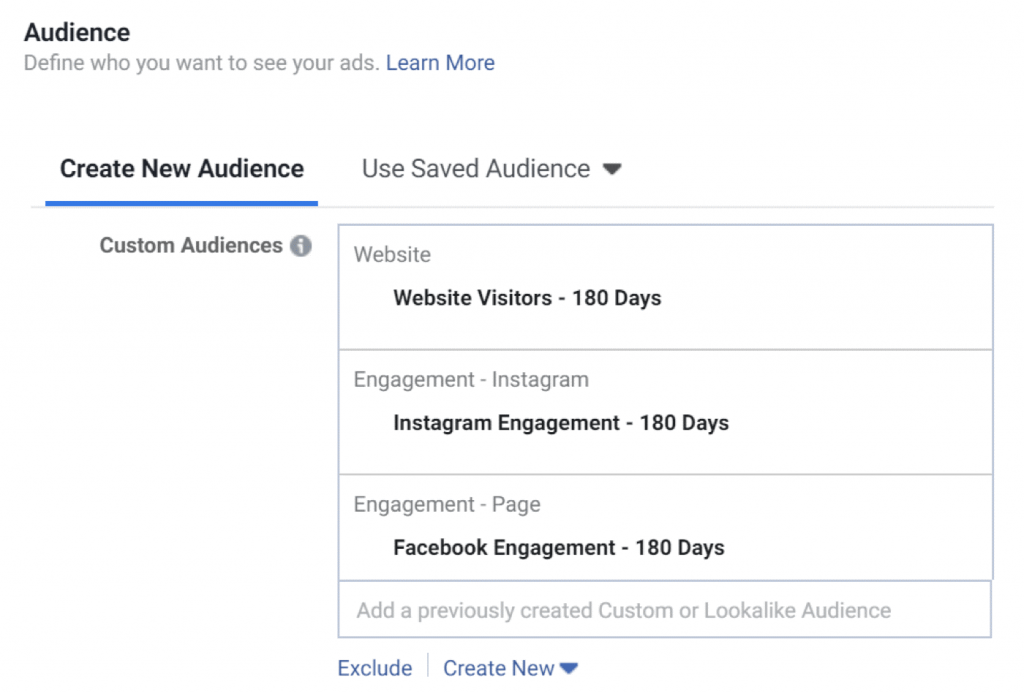
Once your eCommerce site is set up with Facebook, create custom audiences to target.
You want to build custom audiences based on your email list, engagement with your business, and website visitors.
These are the people you want to target at the middle and bottom of the funnel because they’re already engaging with your business, browsing your website, and looking at your products.
These audiences will be your money-makers.
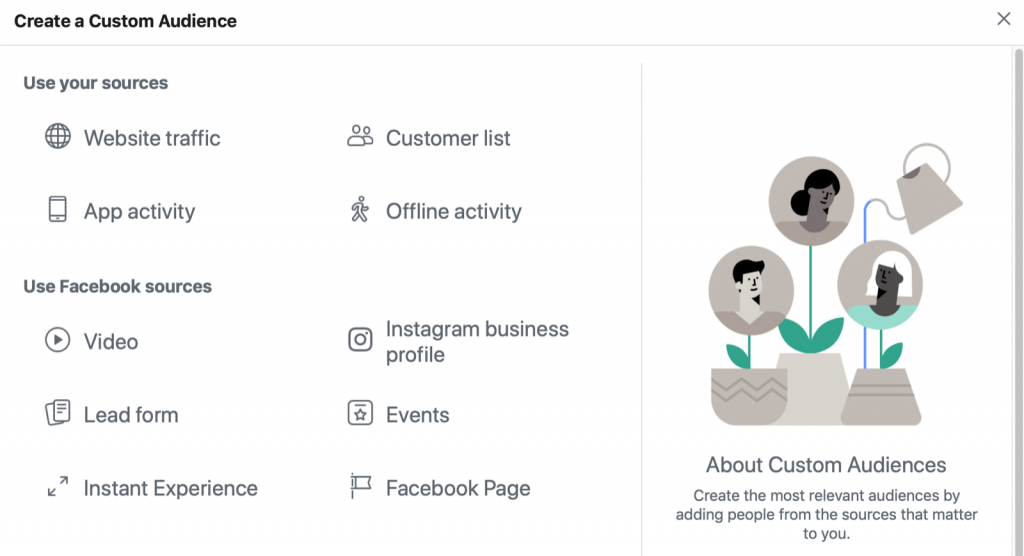
To create a custom audience, go to the Audiences dashboard in Facebook Ads Manager or Business Manager.
Then click Create Audience and select Custom Audience from the drop-down menu.
Next, you’ll see the different sources you can choose from to create
your custom audience.
For your Facebook ad campaign funnel, you’ll want to create custom
audiences based on these sources: Website Traffic, Customer List, Instagram
Business Profile, and Facebook Page.
Custom Audience of Email Subscribers and Purchasers
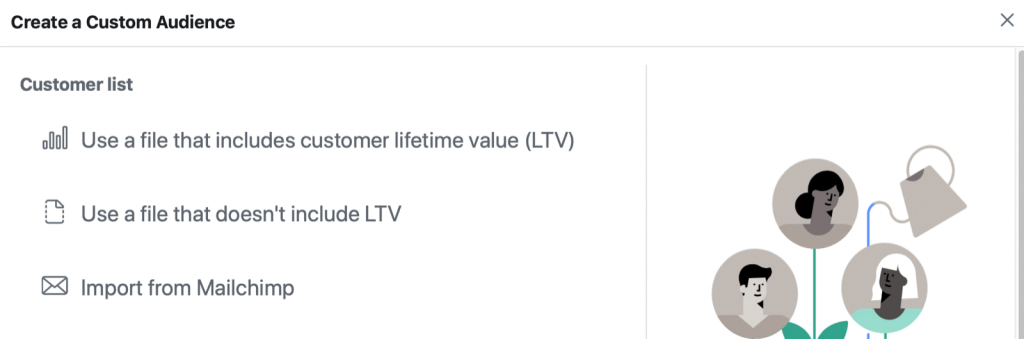
To create a custom audience of email subscribers, select Customer List as the source.
Then upload your email list (downloaded from your email marketing platform) and follow the prompts to create your audience.
Now repeat this process to upload your past purchasers list (downloaded
from your eCommerce platform) to create another custom audience.
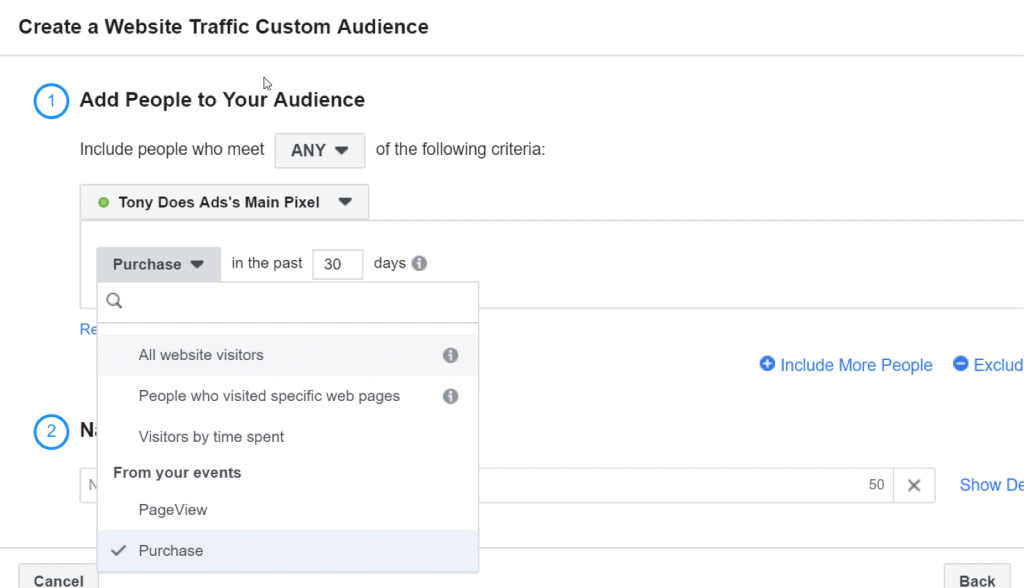
Custom Audience of Past Purchasers
To create a custom audience of past purchasers, select
Website Traffic as the source.
In the audience creation window, choose your pixel and
select the Facebook pixel conversion event for Purchase. After you enter a
descriptive name for the audience, click Create Audience.
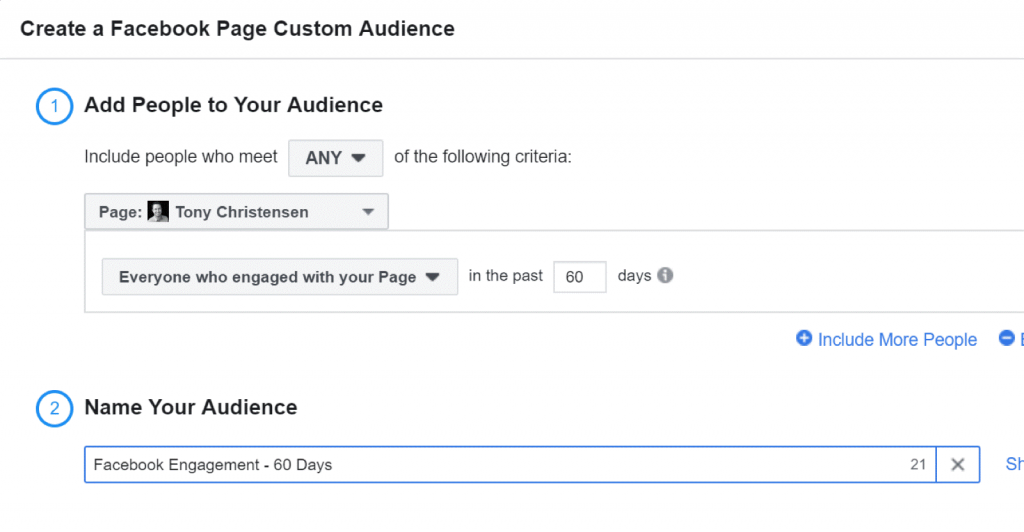
Facebook Page Custom Audience
To create your Facebook page engagement custom audience,
select Facebook Page as the source.
In the audience creation window, choose your Facebook
page and the Everyone Who Engaged With Your Page option. Type in a descriptive
name for your audience (such as Facebook Engagement – 60 Days) so you know
instantly what it is. Then click Create Audience.
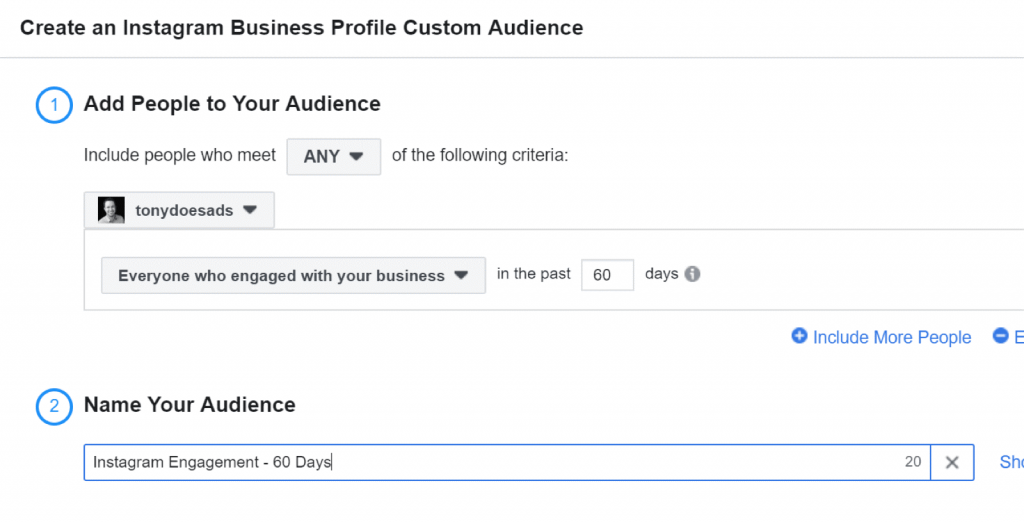
Instagram Business Profile Custom Audience
Also create a custom audience based on engagement with your Instagram
business profile.
In the audience creation window, select your Instagram business page and choose Everyone Who Engaged With Your Business.
After you add a descriptive name for this audience, click Create Audience.
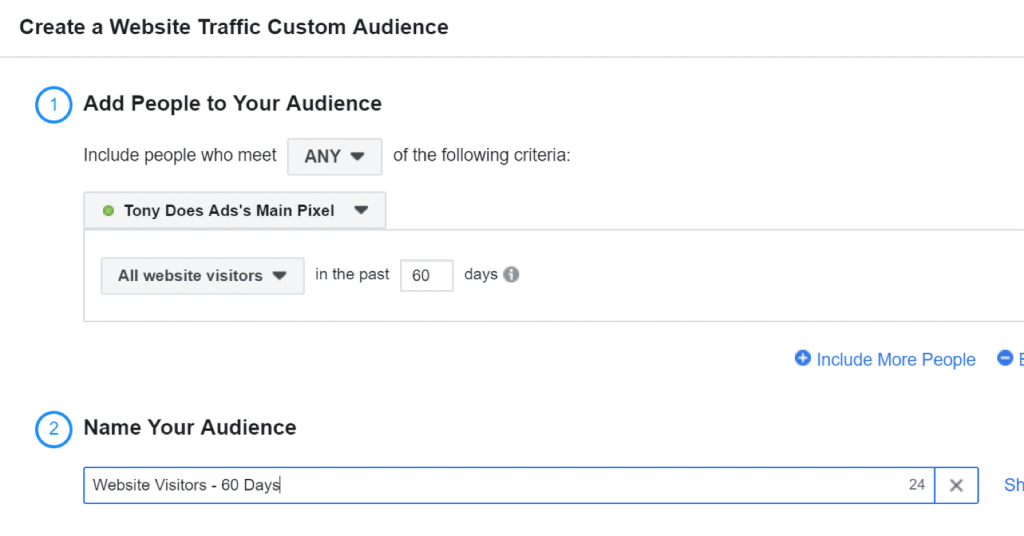
Custom Audience of Website Visitors
Now select Website Traffic to create a custom audience based on your
website visitors.
You’ll want to create website custom audiences based on different time lengths so you can properly leverage remarketing.
Test different periods of time to find out which audiences perform best for your business.
In general, the shorter the time frame of a custom audience, the higher
the audience’s recollection of your business and products.
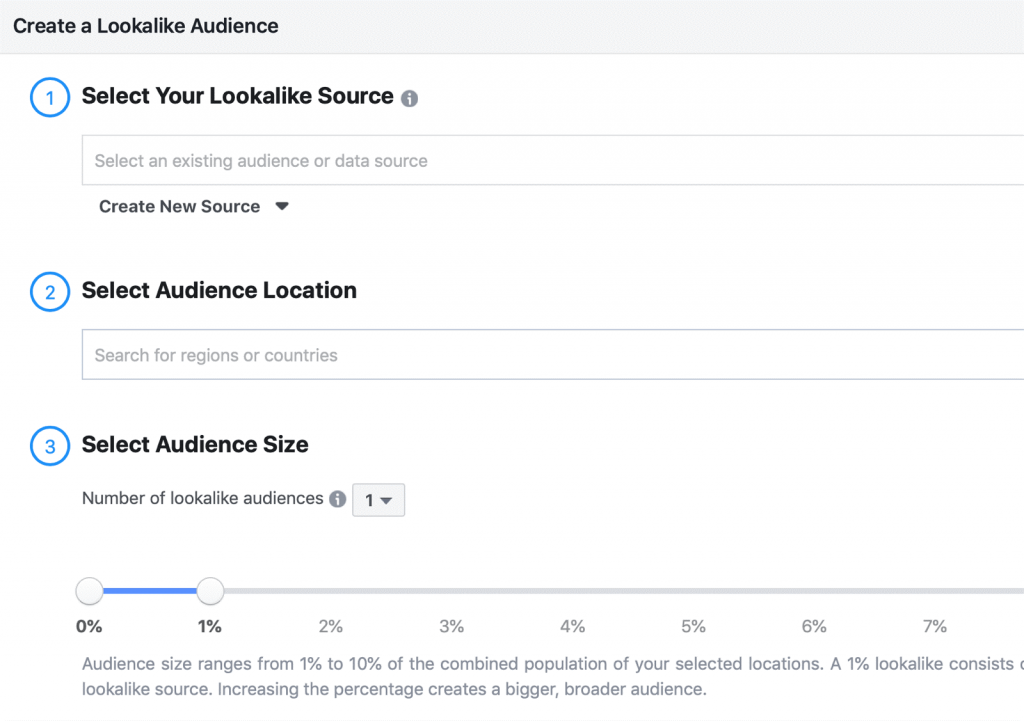
In the lookalike audience creation window, select your lookalike source (the past purchasers list you already uploaded) and your audience’s location. Then click Create Audience.
Note: If you don’t have many purchasers yet, use your email list.
If you don’t have an email list, you’ll have to do interest-based targeting at the top of your funnel.
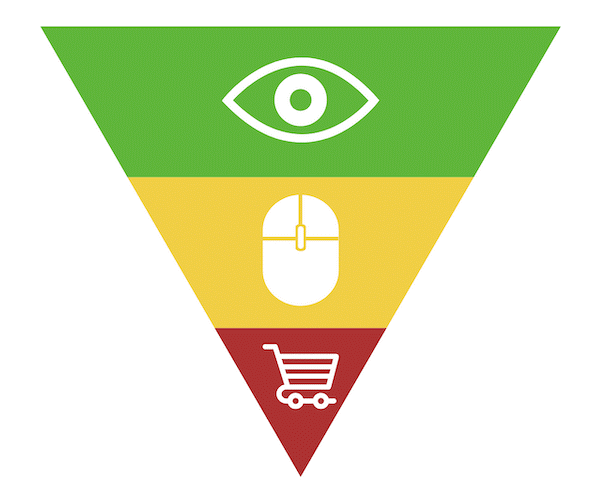
#3: Establish Product Awareness With a Top-of-Funnel Facebook Campaign
Now that you’ve created your audiences, let’s dive into the overall
strategy of your Facebook advertising funnel. In a nutshell, here’s what you
want to happen at each stage:
Top of funnel—Create content that gets people’s eyes on your brand and products.
Middle of funnel—Remarket to people who showed an interest in your brand at the top of the funnel. You want to get these people to view the products on your website.
Bottom of the funnel—After people have engaged with your brand and viewed your products, it’s time to get them to purchase. This happens at the bottom of your funnel.
We’ll start with the top-of-funnel campaign.
New advertisers often go wrong by pushing to sell their products to people who have never heard of their business and products (cold audiences).
Instead of being a pushy salesperson, you want to warm up your target audiences by providing content that grabs their attention and speaks to them.
You also want to build social proof with top-of-funnel campaigns.
Videos work well for this stage of the funnel, but keep in mind that the audiences you’re targeting are complete strangers.
You want your content to keep their attention so avoid long introductions and don’t use the same shot for longer than 3 seconds.
Instead, start the video with people talking or movement, add video overlays, and leverage jump cuts and b-roll.
For this example, assume you’re spending $10,000 or more a month on advertising.
If your monthly spend is lower, you’ll likely want to run a Video Views or Engagement campaign for your top-of-funnel videos.
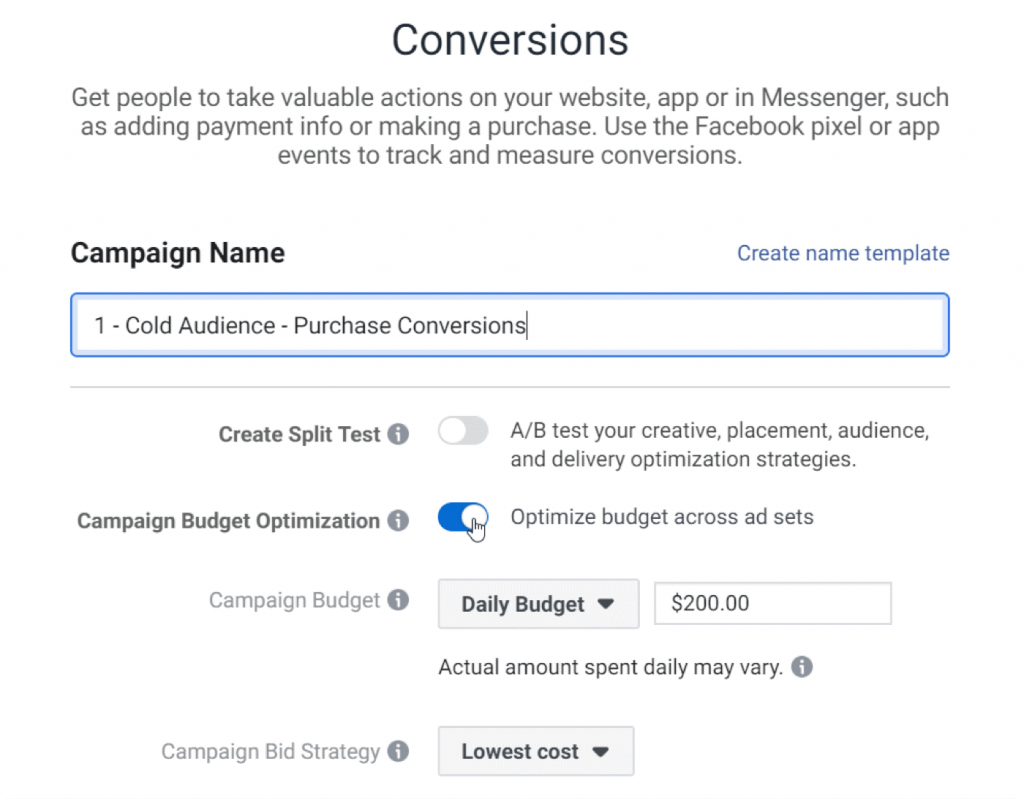
Create a New Campaign
To get started, create a new Facebook campaign and choose
the Conversions campaign objective.
Facebook optimizes based on the campaign objective you
choose. With the Conversions objective, Facebook will show your ads to people
who are most likely to convert. Likewise, if you choose Video Views, your ads
will be shown to people who are more likely to watch videos on the platform.
Next, enter a name for your campaign that makes it easy
to identify which stage of the funnel it corresponds with.
Next, choose the Campaign Budget Optimization option and set your budget.
If you don’t currently have engagement on your Facebook page and Instagram account, you’ll want to use a bigger portion of your budget for the top of the funnel.
Then slowly move your budget down the funnel when you have more engagement and website visitors.
Finally, click Continue to create the campaign.
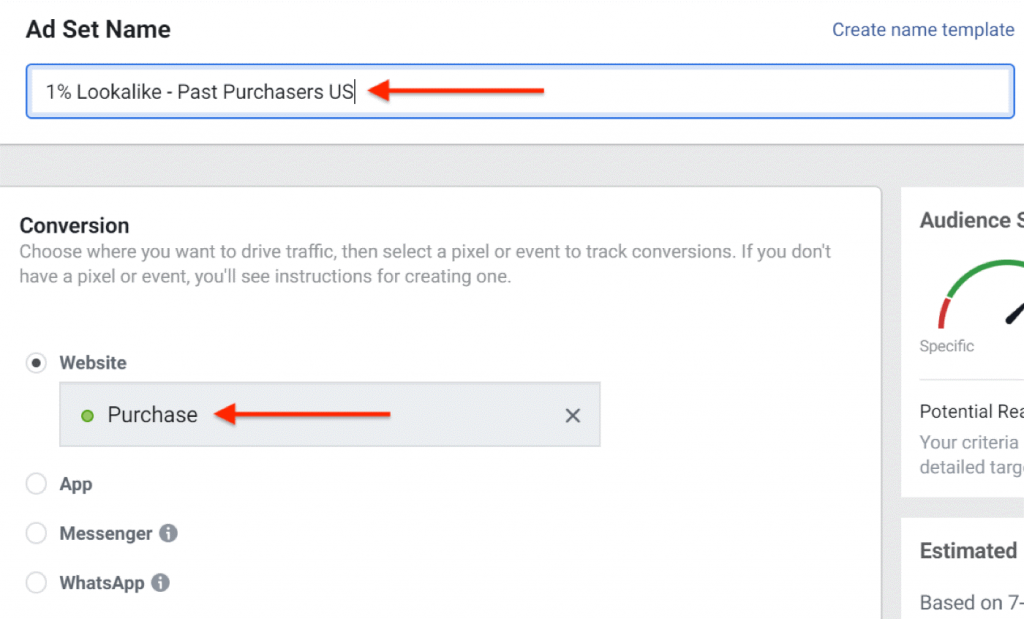
Set Up the Facebook Ad Set
At the Ad Set level, enter a name for your ad set and select Purchase in
the Conversion section.
In the Audiences section, select your 1% lookalike audience of past purchasers.
Also choose the location of your target audience.
Under Placements, select Automatic Placements to let Facebook optimize placements based on results.
Finally, click Continue to create your ad set.
Design Your Facebook Ad Creative
At the Ad level, name your first ad and upload your
video.
For the primary text of the ad, speak to your target
audience in their words. Reference why people love your products and why
consumers should choose yours over your competitors’. Don’t push to sell;
instead, get your targeted audience interested and curious about your products.
If you can, interview your existing customers and use
their responses in your ad copy. This will help your ads resonate better with
your intended audience.
End your primary text with a subtle call to action that
says, “Learn More: [Your Website URL].” Adding your website URL to the ad copy
with the Facebook News Feed placement will help increase your ad
click-throughs.
Note: Links won’t be clickable with the Instagram Feed
placement so you may want to separate Instagram placement ads out.
For the ad’s headline, write something that grabs your
ideal customer’s attention.
Next, add your website URL and select Learn More as your
call to action.
Then click Confirm to publish your ad.
#4: Encourage Product Consideration With a Middle-of-Funnel Facebook Campaign
Now that you’re raising awareness of your brand and products, you’re ready to create the middle-of-funnel campaign. In this stage of your funnel, you want to get targeted customers to click on your website to view your products.
When you set up your middle-of-funnel campaign in Ads Manager, use images and videos that display your products in the best possible light. Make sure any people pictured are smiling and happy (a subtle technique that can have a big impact on sales).
If you have multiple versions of products, create a collage of two photos to show more products to people scrolling by.
Pro Tip: Adding subtle contrast and clarity to your images can help make your ad creative pop more than other images and videos it competes with.
Create a New Facebook Campaign
When you create your middle-of-funnel campaign, select
the Conversions campaign objective and name your campaign (to illustrate, “2 –
Purchase – [Product Set Name]”).
Set your budget based on the amount of engagement you
have. The more Facebook/Instagram engagers and website visitors you have, the
higher your budget can be in the middle of your funnel.
When you’re done, click Continue.
Set Up the Facebook Ad Set
At the Ad Set level, select Purchase in the Conversion
section.
For your ad targeting, select these engagement audiences:
180-day Facebook page engagers
180-day Instagram business profile engagers
180-day website visitors
Depending on the products you’re selling, you may want to
exclude purchasers from the middle of your funnel. If your customers typically only
buy once from you, exclude purchasers here.
Next, add the location of the targeted audience. Choose
Automatic Placements to let Facebook optimize placements based on results.
Design Your Facebook Ad Creative
At the Ad level, start by naming your ad. Then upload
your videos and/or images.
For your primary text, address your ideal client by
asking a question they can answer “yes” to, helping hook them into reading more
of your copy. Explain how your product solves customer pain points.
End your primary text with a stronger call to action that
says, “Shop Now: [Your Website URL]”.
Next, write a headline that grabs your ideal customer’s
attention. Then add your website URL and select Shop Now as your call to
action.
Finally, click Confirm to publish the ad.
#5: Sell Your Products With a Bottom-of-Funnel Facebook
Campaign
Once people are viewing your products, it’s time to start closing sales with a bottom-of-funnel campaign.
With your product catalog synced with Facebook, you can run dynamic product ads.
These are powerful ads that can show customers the exact products they viewed on your website.
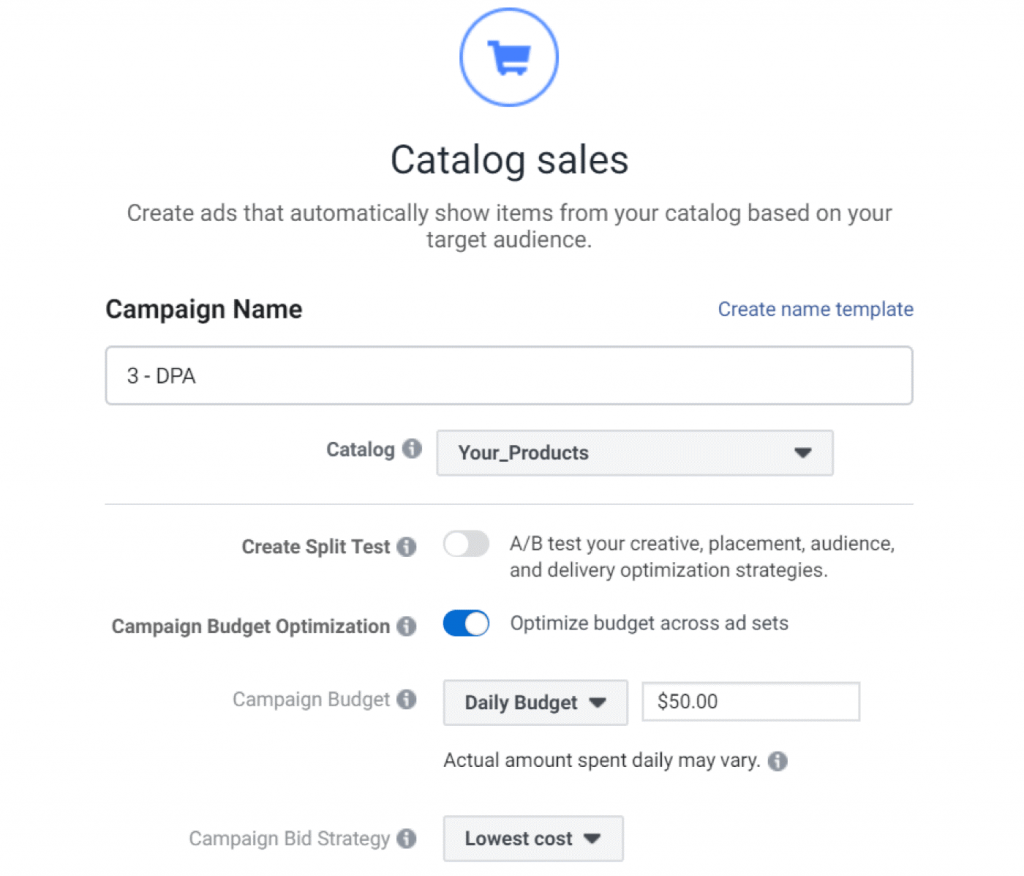
Create a New Facebook Campaign
Start by creating a new Facebook campaign with Catalog
Sales as your campaign objective. Then type a name for your bottom-of-funnel
campaign (“3 – DPA,” for example).
From the Catalog drop-down menu, select the appropriate
product catalog.
Allot a smaller percentage of your budget for this
campaign. This is the smallest audience you’ll target because people are
getting filtered down at each stage of the funnel.
Click Continue to create the campaign.
Set Up the Facebook Ad Set
To set up the ad set, select All Products or the specific
product set you want to promote.
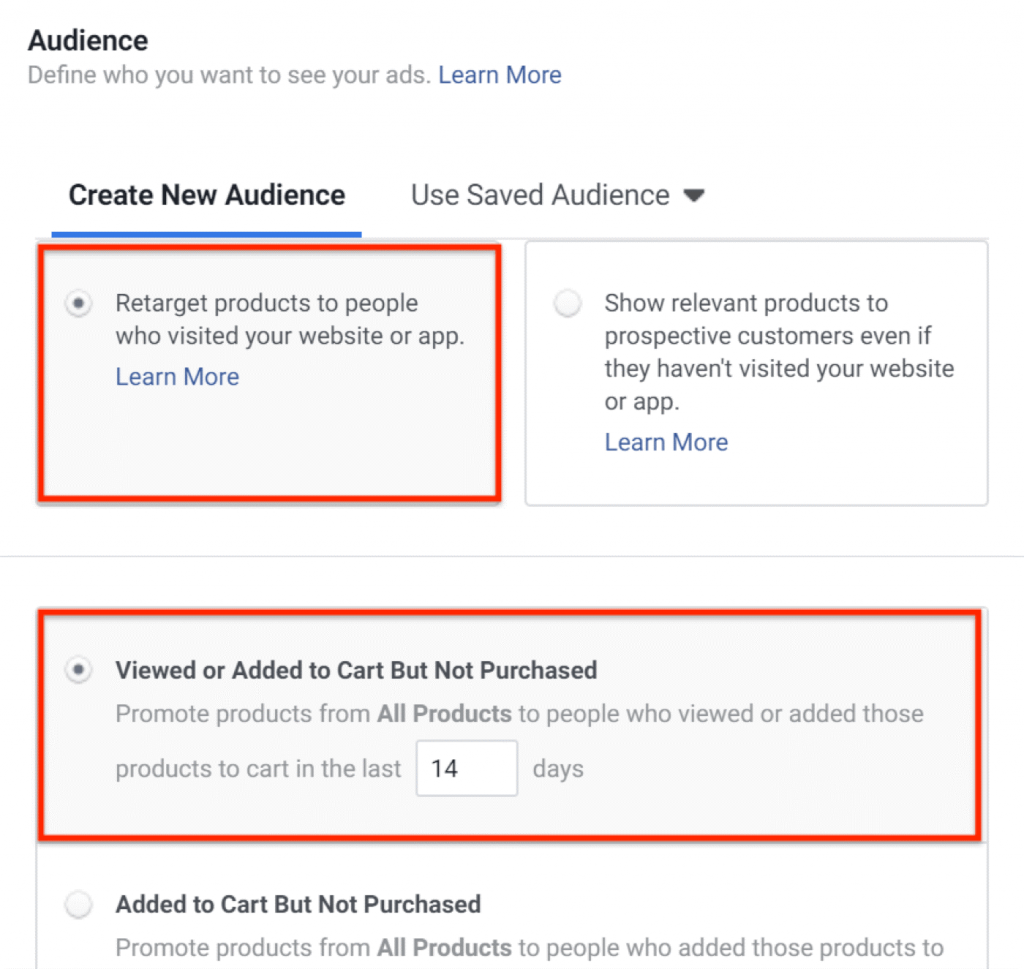
In the Audience section, select the Retarget Products to
People Who Visited Your Website or App option.
Next, select the Viewed or Added to Cart But Not
Purchased option and enter 14 in the Days field (you’ll want to test this
number based on how many website visitors you have).
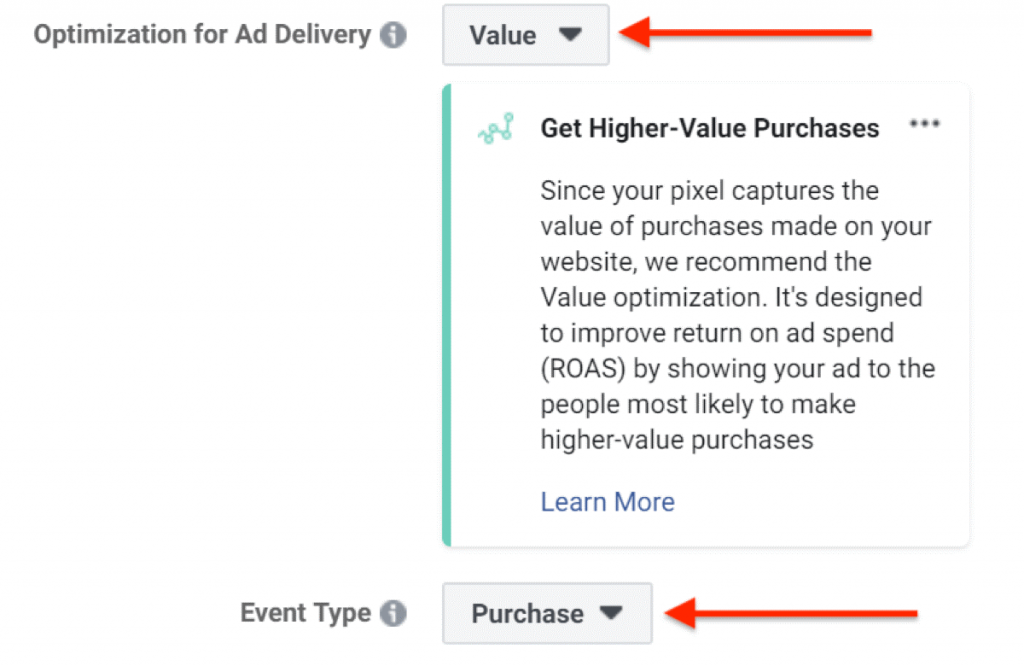
Set Optimization for Ad Delivery to Value. Choose
Purchase for the event type.
Under Placements, choose Automatic Placements to let
Facebook optimize placements based on results.
Finally, click Continue to create your ad set.
Design Your Facebook Ad Creative
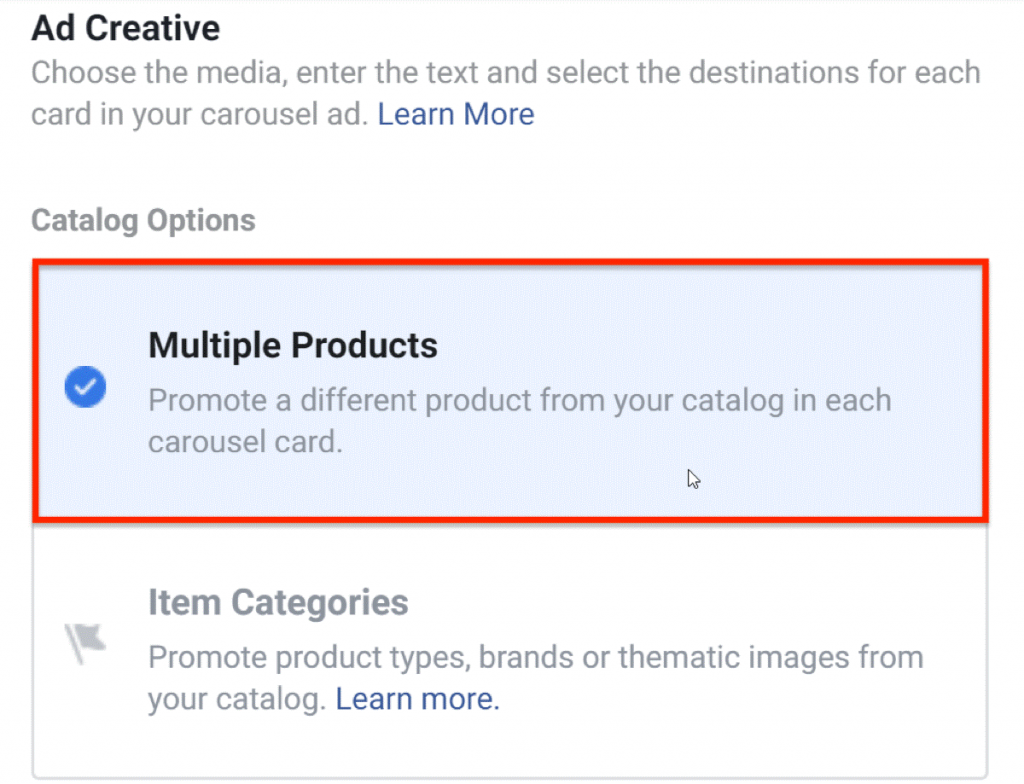
At the Ad level, select the Carousel ad format. In the Ad Creative
section, choose Multiple Products under Catalog Options.
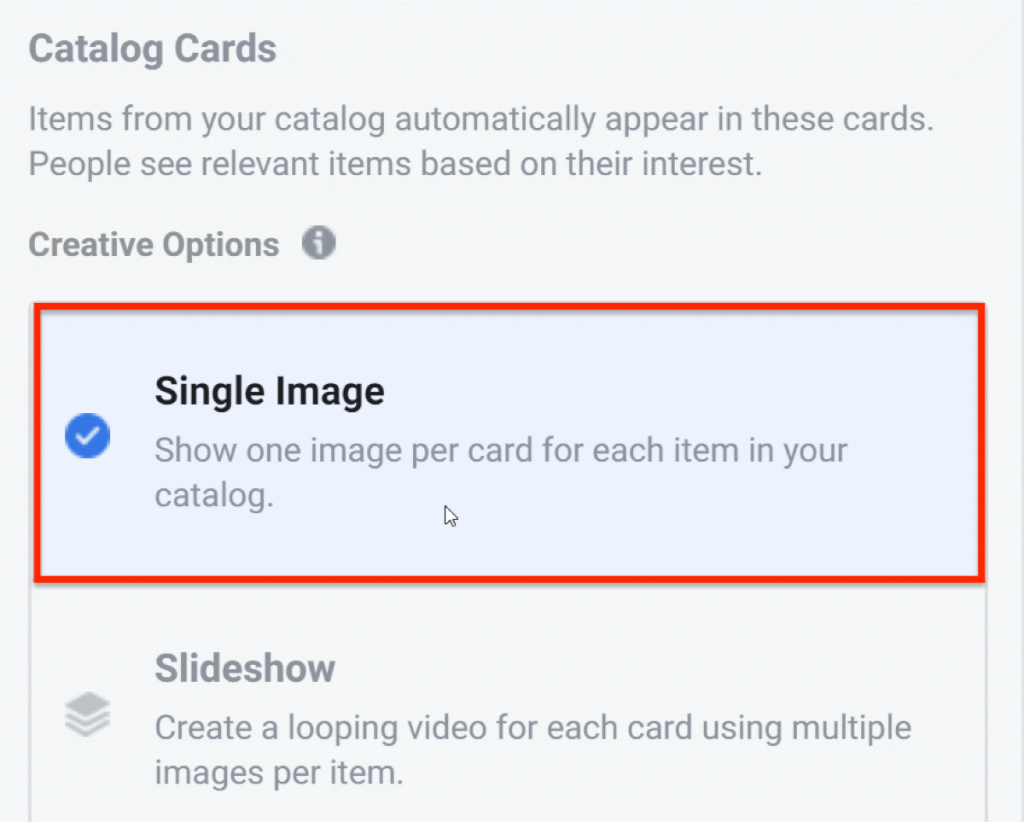
Next, select Single Image for your creative option.
For the primary text of the ad, invite customers to come back and complete their purchase.
Under See More Display Link, add your website URL.
Select Shop Now as your call to action.
Then click Review and publish the ad.
#6: Create Remarketing Campaigns for Product Launches and
Repeat Orders
While your entire funnel is now complete, don’t forget about the people who have already purchased from you.
These are your best customers.
To re-engage these past purchasers, create another middle-of-funnel
campaign.
Target Past Purchasers With a Product Launch Campaign
When you have new items to launch (whether a new version of a product,
new color, or brand-new item), announce it in a conversion campaign to past
purchasers.
Create a new middle-of-funnel campaign that targets 60-day purchasers.
Test various images and videos to see what performs best.
After you know what works, duplicate those ads to the middle-of-funnel 180-day engagement audience.
This is a great way to build social proof for new products.
Show the release to past purchasers first.
Then duplicate the top-performing ads and target your 180-day engagement audience of people who haven’t converted yet.
Target People When Their Product Is About to Run Out
Create another middle-of-funnel campaign that targets people right when their product is about to run out.
Remind them to come back to your site to reorder the product.
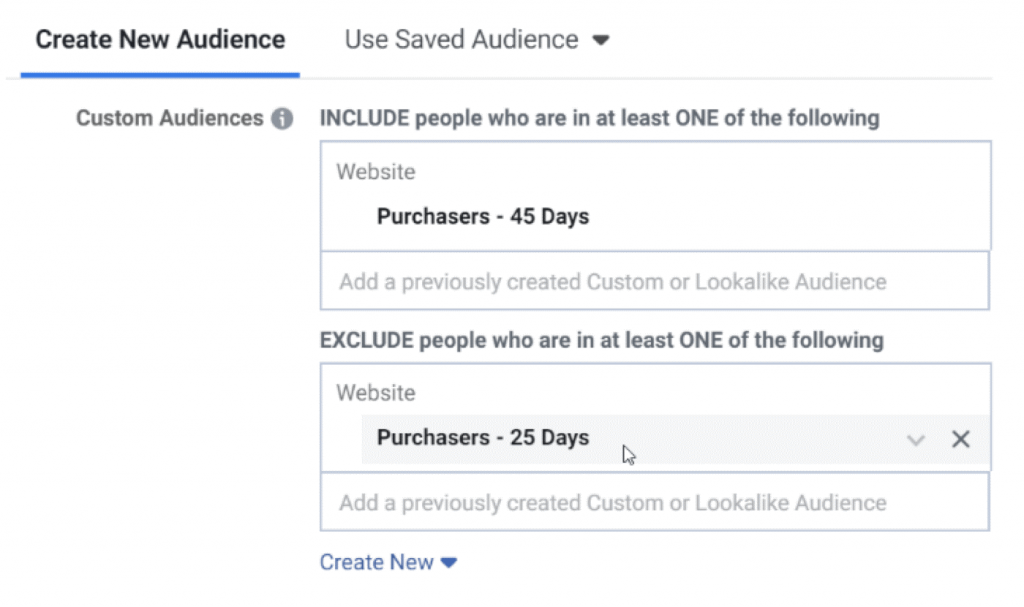
For instance, if you sell a package of coffee beans that lasts about 30
days, create a conversion purchase campaign that targets a 45-day purchaser
audience and excludes a 25-day purchaser audience.
This campaign will hit people with a reminder to reorder their favorite coffee beans at the right time.
You could create a similar campaign to target one-time purchasers, encouraging them to subscribe to your product monthly.
Conclusion
This is a Facebook ad campaign funnel structure that will work for most advertisers.
Test different variations of targeting, remarketing time, copy, creative, campaign objectives, and the number of ads you sequence to people in a funnel.
Focus on what works after the learning phase is done for each ad and then optimize the campaigns, ad sets, and ads that perform best.
You can do this by duplicating the ad sets and ads that are performing well.
Then create variations and test again.
Continue to duplicate and optimize to determine what messaging best resonates with your ideal customer.
Remember that customers will get tired of seeing the same ad repeatedly, so be sure to create new content often to keep your audience engaged and happy.
Always be testing.
Privacy Policy
About Duc IT
Website Privacy Policy for ducit.vn
The policy which we employ when dealing with any personal information submitted via this website is outlined below. We aim to take every possible measure to protect your information at all times.
Definitions
“We” or “us” in terms of Data Protection, and your information, refers to Duc IT. “Personal Information” refers to all data you enter into this website that identifies you, or which can be considered privileged, including but not limited to your email address.
Your Consent
By using this website, you agree to this privacy policy, and when you submit any of your details or personal information, you are agreeing that you accept the manner in which we state we will use those details.
We will only make unsolicited contact by email when we require your consent for future contact – for instance, if a site you have registered with has added a newsletter feature, we will contact you once to request your consent. Should you wish that we never contact you, please advise us and we will mark that your details should not be used for this purpose.
Changes to our Privacy Policy
We may change our Privacy and Security policies from time to time – we are constantly reviewing them to ensure that our customers (and their customers) are protected to the best of our abilities. Please check this page regularly for any updates and changes. Should any significant changes take place which could affect the use of your details (and providing you have not prohibited us from contacting you as above), we will request your consent for these changes.
Collection of Personal Information
Information may be collected when you use certain components of this website, but we will always warn you first. All information will be securely transmitted to our servers, where it is held. Only we have access to this information.
If you choose to register with this site, you will be given a password to protect your details – we advise that you choose a secure password, which you do not use elsewhere, and that you do not reveal it to anybody else.
Use of Cookies on our site
Cookies are small files placed on your computer by websites that you visit. They are widely used in order to make websites work, or work more efficiently, as well as to provide information to the owners of the site.
The table below lists the cookies we use and why we do so.
Name
Set by/for
Description
Further reading
__unam
__stid
__uset
__utma
__utmz
ShareThis
We use various social sharing buttons provided by sharethis.com throughout our site in order to make it easier for you to share content with your friends and contacts.
APISID
HSID
NID
PP_TOS_ACK
S
SAPISID
SID
SSID
BEAT
ULS
Google +1
As part of the social sharing provided by ShareThis (see above), we also use the ‘Google +1’ button to allow you to recommend pages on our site to your network.
When you first visit our site, we’ll ask for you to agree to our privacy policy. We use this cookie so that your browser can remember if you’ve said yes – preventing it from showing you the message again.
Most web browsers allow some control of most cookies through the browser settings. To find out more about cookies, including how to see what cookies have been set and how to manage and delete them, visit http://www.allaboutcookies.org. However, please note that if you choose to disable cookies (or not to accept them from our site), then parts of this site may not function correctly.
Duc IT is registered in accordance with Vietnam Data Protection Legislation and will only store and use your data in compliance with these laws.
Your rights to access your personal information
You have the right to request a copy of all information held relating to you, and we are happy to comply with any requests made. However, we reserve the right to make a small charge to cover our costs, should you require a printed copy. We will provide electronic copies (via E-Mail) at no charge.
Please contact us directly should you wish to make such a request. We will only e-mail details to the address which we have recorded for you – and may require proof of identification if you request a printed copy of your information.
Updating your information
Should any of your details change, you may update them either by contacting us directly or if you are a registered user, by logging into the site and editing your profile directly.
How to contact us
If you would like any further information or have any comments about our privacy policy, please contact our Data Protection Officer as per below:
By post:
Huynh Phuong Duc
Duc IT
Tien Canh
Tien Phuoc
Quang Nam
560000
Phone: 0907317104
Terms & Conditions
About Duc IT
Our standard Terms & Conditions
This page outlines the Terms of Service for our website (ducit.vn) and any other sites owned and operated by us. We also give a summary of our terms of business, however the latter is neither exhaustive nor complete and a full copy will be provided to you along with your contract for any given engagement. If you are concerned over how we use your information, please see the ducit.vn Privacy Policy.
Duc IT Website Terms of Use
By using our website, you are accepting these terms of service
We take no responsibility for any external links (e.g. those pointing to sites not wholly hosted and/or owned by ourselves)
All material published within the pages of this site (including downloadable content) is the property of Duc IT Ltd (unless otherwise indicated) and may not be reproduced, stored or copied without our express written permission
In accordance with the above, if you choose to submit a comment against one of our news items, blog posts or articles, we reserve the right to edit and reproduce your comments as we see fit
Where such material contains suggestions, advice or other information, no warranty is supplied and we can accept no responsibility for any damages or loss incurred from the use (or misuse) of any features, information or other content served from this website
Duc IT Terms & Conditions
Specific terms and conditions apply to several of the services we offer (including web hosting, mail hosting and Cloudeware services). These are available upon request and will be provided to you prior to commencement of any agreements.
We operate under a standard “supplier agreement” for most bespoke work undertaken. A customised copy of this document will be provided for your review prior to commencement of any works.
By default, when undertaking web-based projects, we support the following web browsers. Where no version is specified, we support the latest version, tested on Windows 7.
Internet Explorer (7 and later)
FireFox (8 and later)
Opera
Safari
Chrome
Support for other browsers (and platforms) is available upon request.
We do not typically test projects on mobile platforms or on platforms other than PC/Windows unless a specific requirement is raised as part of the project brief, however we are happy to work with our clients should they have other requirements.
Where possible a UAT (User Acceptance Testing) version of the project will be made available for sign-off prior to live release and the acceptance of this test version forms “completion” of the project under our standard terms. This facilitates an improved testing and fault resolution process and helps us work with our clients to improve the quality of the service which they receive.